

Walnut vs Maple Box: Which Wood Should You Pick?
For most keepsake and appearance-driven boxes, walnut is the better choice. For high-use cabinetry, drawer boxes, and surfaces that take daily punishment, hard maple wins. The difference comes down to one trade-off: walnut’s rich chocolate grain reads as premium the moment someone picks up the box, while maple’s density and hardness mean edges stay crisp and surfaces resist dents after years of use.
Three quick decision pointers before you read further:
- Appearance is the priority? Walnut. Its color and figure do the work that craftsmanship alone cannot.
- Wear resistance and tight tolerances matter most? Maple. It machines cleanly and holds edges longer.
- Combining both? Skip to the pairing and acclimation section for layout ratios and glue-up guidance.
Key Takeaways
Walnut wins on appearance and finishing ease; maple wins on hardness, wear resistance, and cost — and the right choice depends on which of those factors your specific project actually demands.
| Point | Details |
|---|---|
| Species verdict | Walnut suits appearance-driven boxes; maple suits high-wear cabinetry and drawer boxes. |
| Hardness gap | Maple’s Janka of ~1,450 lbf vs. walnut’s ~1,010 lbf means maple holds edges longer under daily use. |
| Finishing difference | Walnut takes oil and shellac evenly; maple blotches under pigment stains and needs clear or water-based finishes. |
| Movement planning | Maple’s tangential shrinkage (~9.9%) exceeds walnut’s (~7.8%); use floating panels and quartersawn stock for wide pieces. |
| Treelockbox option | For ready-made lockable hardwood storage, Treelockbox offers secure, odor-controlled boxes with custom engraving. |
Table of Contents
- How walnut and maple compare: specs and quick shop implications
- How walnut and maple actually look on a small box or cabinet
- What Janka, density, and shrinkage actually mean for your build
- Routing, dovetails, and planing: what each species demands in the shop
- Finishing walnut and maple: what works and what to avoid
- Shop-tested finishing checklist and a non-toxic option for storage boxes
- When walnut is the right call: use cases and sourcing
- When maple is the right call: use cases and prep checklist
- Pairing walnut and maple: acclimation, glue-up, and layout
- Decision checklist: choose walnut or maple for this box or cabinet
- The wood you choose is already part of the design
- Ready-made lockable boxes: a practical alternative to building your own
- Sources
- FAQ
How walnut and maple compare: specs and quick shop implications
The numbers below translate directly into shop decisions. Hard rock maple (Acer saccharum) runs 44–50 lbs/ft³ with a Janka hardness near 1,450 lbf; American black walnut (Juglans nigra) comes in at 38–43 lbs/ft³ with a Janka near 1,010 lbf. That 440-lbf gap is meaningful: maple resists denting and edge wear noticeably better, while walnut’s lower density makes it easier to hand-plane and rout without fighting the wood.
| Feature | American Black Walnut | Hard Rock Maple |
|---|---|---|
| Color & visual effect | Chocolate to purple-brown; open, dramatic grain | Pale cream to off-white; tight, subtle figure |
| Janka hardness | ~1,010 lbf | ~1,450 lbf |
| Density | 38–43 lbs/ft³ | 44–50 lbs/ft³ |
| Radial shrinkage | ~5.5% | ~4.8% |
| Tangential shrinkage | ~7.8% | ~9.9% |
| Workability | Machines easily; open pores need filling | Harder to plane; prone to tear-out and fuzz |
| Finishing behavior | Takes oil and shellac beautifully; stains evenly | Blotchy with pigment stains; best with clear or toned finishes |
| Cost & US availability | $8–$15/bd-ft at most hardwood dealers | $5–$10/bd-ft; widely available nationwide |
| Best use cases | Keepsake boxes, accent faces, luxury drawer fronts | Drawer boxes, high-wear cabinetry, tool chests |
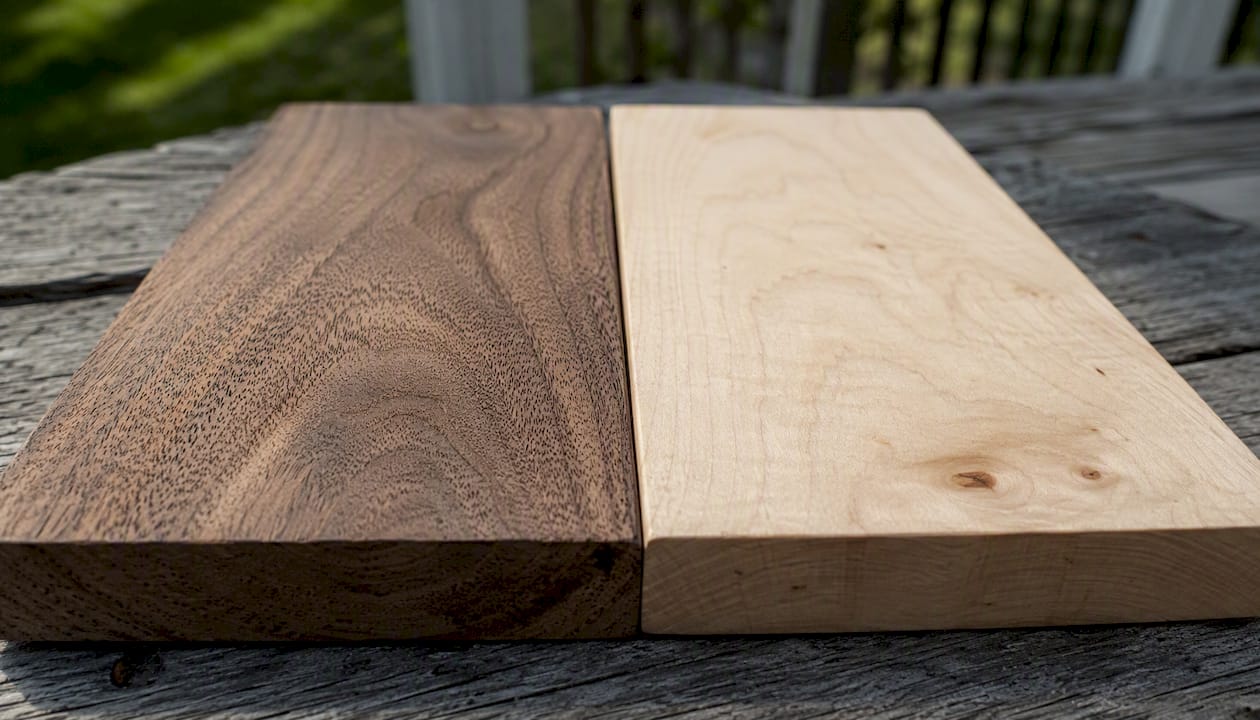
Janka note for small boxes: on a panel under ¾" thick, the hardness gap matters less for structural integrity and more for edge durability. A walnut box lid will show dings faster than a maple one if it lives on a workbench. For a display shelf, that difference is invisible.
Common variants worth knowing: birdseye and curly maple add figure but require extra care in milling. Figured walnut (crotch or feather-crotch) is spectacular on box lids but costs significantly more per board foot and needs careful grain matching.
How walnut and maple actually look on a small box or cabinet
Walnut’s color ranges from a warm chocolate brown to deeper purple-tinged tones in freshly milled boards, settling toward a golden-brown over time as UV exposure does its work. The grain is open and moderately coarse, with a natural figure that reads as intentional and expensive even on a simple box with no joinery detail. A maker’s experiment comparing identical boxes built from walnut versus construction lumber confirmed what most woodworkers already sense: the species alone shifts perceived value dramatically, regardless of how well the box is built.
Maple reads completely differently. Its pale, creamy surface and tight grain give it a clean, almost architectural quality. On its own, it can look plain. Paired with a dark inlay or a walnut frame, it becomes the visual foil that makes both species pop.
Design tips for boxes and cabinet faces:
- Use walnut for the primary visual plane (lid, front panel, door face) when the goal is warmth and perceived luxury.
- Use maple for secondary surfaces, drawer boxes, and interior components where clean edges and durability matter more than color.
- Walnut-and-maple inlay strips on a box lid create contrast without requiring figured wood — a cost-effective way to add visual interest.
- For a consistent run of cabinet doors, select boards from the same log or flitch to keep color variation manageable. Walnut varies more board-to-board than maple.
Before committing to a full build, wet both species with mineral spirits to simulate a finished look. Cut small swatches (roughly 4" × 6") and finish them with your intended topcoat. Live with them for a day under the lighting where the piece will actually sit.
Pro Tip: Natural daylight and warm incandescent light read walnut’s color very differently. Photograph your test swatches under the same light source you use for product shots or client presentations — what looks rich and warm in the shop can appear muddy in a photo taken under fluorescent overhead lights.
What Janka, density, and shrinkage actually mean for your build
Maple’s 1,450 lbf Janka rating means it resists denting under hard use. A maple drawer box will outlast a walnut one by years in a kitchen where pots and pans get dropped. Walnut at 1,010 lbf is still a hardwood — it is not fragile — but its edges will show wear faster on high-traffic surfaces.
Density matters for machining as much as for durability. Walnut’s lower density (38–43 lbs/ft³) means it responds well to hand tools and cuts cleanly on the router table with standard feed rates. Maple’s higher density (44–50 lbs/ft³) demands sharper tooling and more deliberate feed control to avoid burning and tear-out.
Shrinkage is where small box construction gets tricky. Walnut’s tangential shrinkage runs around 7.8% and maple’s around 9.9%, meaning maple moves more across the grain as humidity shifts. For a small box with a floating panel lid, that difference is real: a 10" maple panel can move noticeably more than a walnut one through a seasonal humidity swing. Quartersawn boards reduce tangential movement significantly for both species and are worth the premium for lids and wide panels.
Practical rules of thumb:
- Target a moisture content of 6–9% for finished indoor boxes. Acclimate rough stock in your shop for at least five to seven days before milling to final dimensions.
- Use ¾" stock for box sides and ⅜"–½" for lids on most keepsake boxes. Thinner panels in maple need more careful attention to grain orientation.
- For lids wider than 6", consider quartersawn stock or a glued-up panel with alternating grain direction to minimize cupping.
- Floating panel construction (rather than glued-in panels) is the right call for any box wider than about 8" in either species.
For durable storage box construction, these movement considerations are not academic — a lid that binds or a joint that opens up seasonally is a functional failure, not just an aesthetic one.
Routing, dovetails, and planing: what each species demands in the shop
Walnut is forgiving. It planes cleanly with a sharp iron, routs without burning at normal feed rates, and glues reliably with PVA or hide glue. Its open pores can telegraph through thin film finishes if you skip grain filling, but that is a finishing problem, not a milling one. Dovetails cut cleanly in walnut by hand or router, and the contrast between walnut’s dark grain and a maple tail board is one of the most visually striking joinery combinations in small box work.
Maple is harder to read in the shop. It burns easily on the router table if the bit is even slightly dull or the feed rate drops. Hand planing against the grain produces tear-out fast, especially in figured stock. The surface can fuzz after sanding if you skip grits or use worn paper.
Shop guidance for both species:
- Keep router bits and plane irons sharp. With maple, dull tooling is the single biggest source of problems.
- Use a backer board when routing maple end grain. Without it, the exit corner blows out.
- For figured maple (birdseye, curly), take light passes with a hand plane at a skewed angle, or use a card scraper instead of sandpaper for final surfacing.
- Mortise-and-tenon joints work well for frame-and-panel cabinet doors in both species. For small boxes, hand-cut or router-jig dovetails are the standard.
- Floating panels in wide cabinet doors need expansion gaps: roughly 1/16" per 6" of panel width in maple, slightly less in walnut.
Pro Tip: When routing a profile on maple end grain, make a climb cut first at very light depth, then follow with a conventional pass. The climb cut removes the material that would otherwise tear out at the exit corner. Keep your hands clear and use a push block.
Finishing walnut and maple: what works and what to avoid
Walnut and maple behave almost opposite each other under finish. Walnut’s open grain absorbs oil finishes readily, producing a warm, deep look with minimal effort. Maple’s tight, dense surface resists penetrating oils and blotches badly under pigment stains — a problem that catches a lot of makers off guard the first time they try to match a walnut stain on a maple accent piece.
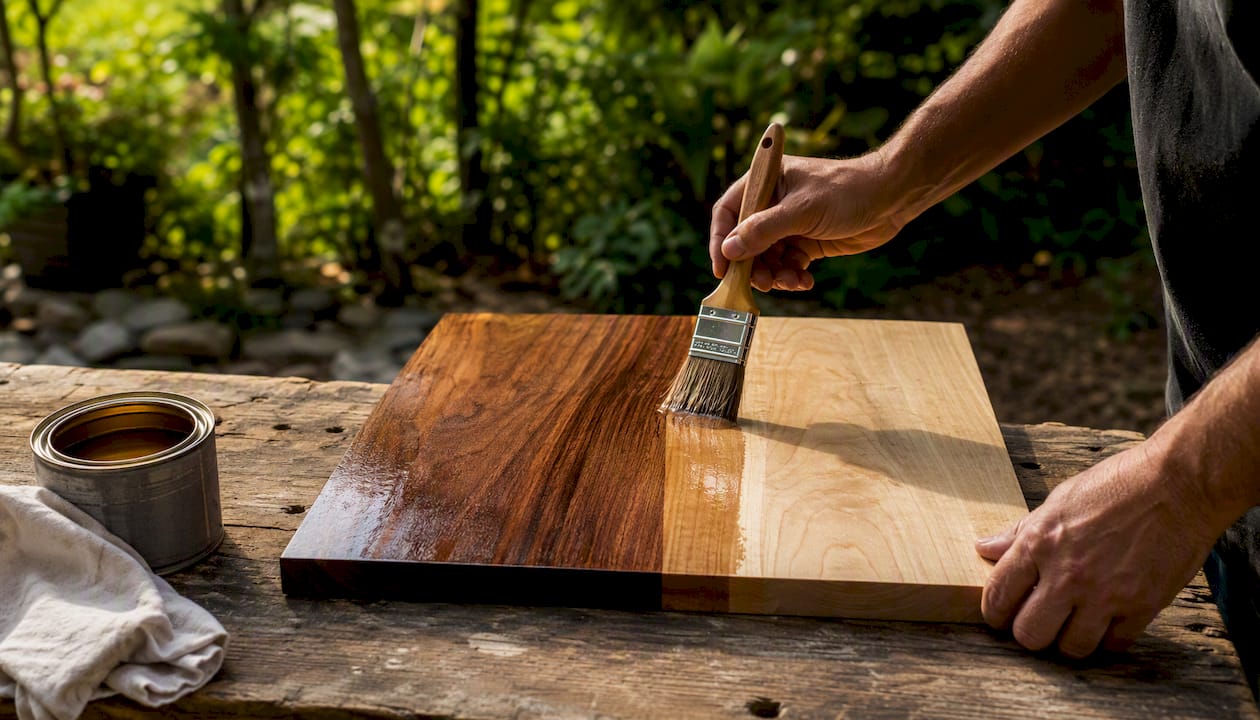
Film finishes vs. penetrating finishes:
Film finishes like polyurethane, Arm-R-Seal, and lacquer build a surface layer that protects well and deepens walnut’s color. Arm-R-Seal and comparable film finishes do enrich walnut’s appearance, but they carry higher VOCs and longer recoating windows; shellac (button-lac) and oil finishes produce a warmer, more tactile result that many makers prefer for heirloom boxes. On maple, a water-based polyurethane or a clear lacquer keeps the pale color intact without yellowing — oil-based finishes will amber maple noticeably over time.
Penetrating finishes like Danish oil and Tried & True Original (a linseed oil and beeswax blend) give walnut a hand-rubbed, tactile quality that suits keepsake boxes. They offer less surface protection than film finishes but are easy to repair and have very low VOCs, which matters for boxes that will store sensitive contents.
Practical finish sequences:
- Heirloom walnut box: Sand to 180 grit, wipe with mineral spirits to preview grain, let dry. Apply one coat of button-lac shellac (2 lb cut) as a sealer. Sand lightly with 320 grit. Apply two to three coats of Arm-R-Seal or wipe-on poly, sanding with 400 grit between coats. Buff final coat with 0000 steel wool and paste wax.
- Maple drawer box or cabinet: Sand to 220 grit. Apply a pre-conditioner if any stain is planned (though clear finishes are simpler). Two to three coats of water-based polyurethane, sanding with 320 grit between coats. No wax on top if the surface needs to slide.
- Walnut/maple combination box: Seal walnut with shellac first to prevent oil migration into maple. Then apply a unified topcoat (wipe-on poly or Arm-R-Seal) across both species for a consistent sheen.
Pro Tip: Never apply Danish oil or BLO over shellac — they will not bond. Decide your finish system before you start: oil-based or shellac-based, then topcoat. Mixing systems mid-build causes adhesion failures that show up weeks later.
For storage boxes that may hold sensitive contents, allow film finishes to cure fully — at least two to three weeks at room temperature — before sealing the compartment. Water-based finishes off-gas faster than oil-based ones and are the safer default for enclosed storage.
Shop-tested finishing checklist and a non-toxic option for storage boxes
Follow this sequence for a reliable result on either species:
- Mill and acclimate. Bring stock to final thickness, then let it sit in the shop for at least five days before cutting joinery.
- Sand progressively. Start at 100 or 120 grit for rough stock, move through 150, 180, and finish at 220 grit for most film finishes. For penetrating oils, go to 180 and stop — finer grits close the grain and reduce absorption.
- Wipe with mineral spirits. This previews the finished color and reveals any mill marks or scratches you missed. Let it dry completely (30–60 minutes) before applying finish.
- Apply sealer coat. For walnut, a 1.5–2 lb cut shellac seals the grain and prevents bleed-through. For maple with a clear topcoat, skip the sealer and go straight to the first topcoat.
- First topcoat. Apply thin coats. Wipe-on poly goes on with a lint-free cloth; brush-on poly with a quality foam brush. Let cure per manufacturer’s instructions (typically 4–8 hours between coats for oil-based, 2–4 hours for water-based).
- Sand between coats. 320 grit for oil-based finishes, 400 grit for water-based. Remove all dust before the next coat.
- Final coat and buff. Two to three topcoats total for most boxes. Buff the final coat with 0000 steel wool and paste wax for a satin feel, or leave as-is for a higher gloss.
Non-toxic finish option for storage boxes: Tried & True Original (polymerized linseed oil and beeswax, no solvents or metallic driers) is one of the lowest-VOC options available for wood boxes. Apply thin coats, buff off the excess within 30 minutes, and allow 24 hours between coats. Full cure takes approximately two weeks. It offers less surface protection than a film finish but is appropriate for boxes storing sensitive contents.
Forum guidance from experienced makers consistently emphasizes two things: test every finish on a sample piece cut from the same board you are using, and never use finish from a can that has been open for more than a year. Skinned-over or partially gelled finish produces an uneven surface that no amount of sanding will fix.
Pro Tip: Before sealing a finished box for long-term storage use, close the lid and leave it in a warm room for 24 hours. Open it and smell the interior. If you detect a strong solvent or oil odor, the finish needs more cure time. A fully cured finish should smell faintly of wood, nothing else.
When walnut is the right call: use cases and sourcing
Walnut earns its place on any project where the wood’s appearance is doing half the design work. Keepsake boxes, jewelry boxes, humidors, and display cases all benefit from walnut’s natural warmth. On cabinet door faces and drawer fronts in a living room or bedroom, walnut reads as intentional and refined in a way that maple simply does not, at least not without a toned finish.
Where walnut makes sense:
- Keepsake and heirloom boxes where the recipient will notice the material
- Visible cabinet faces, door panels, and accent pieces in furniture
- Box lids with feature grain (crotch, figured, or straight-grained with strong color)
- Projects sold or gifted where perceived value matters as much as durability
Sourcing tips for domestic black walnut:
- Domestic black walnut is widely available at hardwood dealers across the US. Expect to pay $8–$15 per board foot for clear, kiln-dried stock, with figured or crotch pieces running considerably higher.
- For a run of matching box panels, buy from the same flitch or ask your dealer to pull boards from the same log. Walnut’s color varies enough board-to-board that a mismatched set looks accidental.
- Steamed walnut (common in commercial lumber) has a more uniform brown color. Unsteamed walnut shows more purple and green tones in the sapwood — visually interesting but harder to match across a set.
- For panels wider than your available stock, edge-glue two or three boards with grain running the same direction. Alternate the growth ring orientation slightly to reduce cupping.
When budget is tight, walnut veneer over a stable substrate (MDF or Baltic birch plywood) gives the visual result at a fraction of the solid-wood cost. For box sides that will be seen from the edge, solid walnut is still necessary.
When maple is the right call: use cases and prep checklist
Maple is the go-to species where wear resistance matters most: drawer boxes, kitchen cabinetry interiors, tool chest lids, and any surface that sees daily contact. Its tight grain holds crisp edges on routed profiles and resists the denting and scratching that walnut would show after a few months of hard use.
Where maple makes sense:
- Drawer boxes and interior cabinet components
- High-traffic kitchen cabinetry where surfaces get daily contact
- Shop furniture and tool storage where dent resistance outweighs appearance
- Surfaces that will be painted (maple’s tight grain takes paint beautifully)
- Accent pieces and inlays paired with a darker primary wood
Pre-finish prep checklist for maple:
- Sand to at least 220 grit. Maple’s tight grain requires finer sanding than walnut to avoid visible scratches under a clear finish.
- Use a backing board on all routed edges and profiles. End-grain routing on maple without a backer produces consistent blowout.
- If applying any tinted or pigment stain, use a pre-conditioner first. Maple blotches severely without it.
- For figured maple (birdseye or curly), use a card scraper for final surfacing rather than sandpaper. Sandpaper on figured maple raises the grain unevenly and dulls the figure.
- Avoid oil-based topcoats if keeping maple’s pale color is a priority. Water-based poly or lacquer preserves the white tone; oil-based finishes will yellow it within a year.
Pairing walnut and maple: acclimation, glue-up, and layout
Walnut and maple together are one of the most visually effective pairings in small box work. The contrast between walnut’s dark grain and maple’s pale surface is dramatic without being garish, and makers commonly recommend a recommended ratio of walnut to maple for visual balance, along with quartersawn pieces for stability and careful acclimation before milling.
Acclimation checklist:
- Bring both species into the shop at the same time.
- Stack boards with stickers between them for airflow. Target a shop moisture content of 6–9% for indoor furniture.
- Check moisture with a pinless meter at multiple points along each board. Do not mill to final dimensions until readings are stable across two consecutive days.
- Allow at least five to seven days for rough-sawn stock; kiln-dried boards from a dealer may need only two to three days if your shop humidity is close to the dealer’s storage conditions.
Glue-up and joinery guidance:
- Match panel thicknesses before glue-up. A walnut panel and a maple panel that differ by even 1/32" will telegraph through the joint line.
- Use floating panel construction for any combined panel wider than 6". Gluing walnut and maple face-to-face across the grain creates a movement conflict — they will fight each other seasonally.
- Plan expansion gaps based on maple’s higher tangential shrinkage (around 9.9%). In a floating panel, allow slightly more room on the maple side.
- For breadboard ends on a combined top, use elongated slots and a single center glue point. Mechanical fasteners (figure-8 clips or Z-clips) work well for attaching combined tops to cabinet carcasses.
Layout sequence: cut test pieces from both species and arrange them dry before any glue. The 60/40 walnut-to-maple ratio works well for box lids and cabinet door faces, with walnut as the dominant field and maple as the frame or accent strip. Reverse the ratio for a lighter, more contemporary look.
Decision checklist: choose walnut or maple for this box or cabinet
Work through these in order:
- Appearance priority. If the wood’s color and grain are central to the design, choose walnut. If the piece will be painted or the finish will dominate, maple is the better substrate.
- Wear requirement. Surfaces that take daily contact, sliding, or impact belong in maple. Display pieces and lids that are handled gently can be walnut.
- Budget. Maple runs roughly $3–$5 per board foot less than walnut at most US hardwood dealers. For a large run of cabinet boxes, that difference adds up.
- Finish preference. If you want an oil or shellac finish with a tactile, warm result, walnut is easier to work with. If you want a clear, pale, water-based finish, maple is the better canvas.
- Joinery constraints. Both species cut clean dovetails. Maple demands sharper tooling and more careful feed control. If you are routing complex profiles, budget extra time for test cuts in maple.
- Test samples. Cut a 4" × 6" sample from your actual stock, apply your intended finish, and evaluate it under the lighting the finished piece will live in. Do this before cutting any joinery.
Worked example: A keepsake box for gifting runs through the checklist quickly: appearance is the priority, wear is minimal, budget allows for walnut, and a shellac-plus-wipe-on-poly finish suits the heirloom intent. Walnut wins. A kitchen drawer box for a renovation project reverses almost every answer: wear matters, budget is tight, the finish will be clear poly, and the drawer sides will never be seen. Maple wins.
The wood you choose is already part of the design
Perceived value in woodworking tracks the material almost as closely as the craftsmanship. A well-built box in walnut reads as intentional and premium to most people before they even open it. That is not a knock on maple — it is a reminder that the species choice is a design decision, not just a technical one.
The makers who get the most out of both species are the ones who stop treating walnut as the “nice” wood and maple as the “utility” wood. Maple’s pale, tight surface is genuinely beautiful in the right context. A maple box with a hand-rubbed oil finish and crisp hand-cut dovetails is not a compromise — it is a different aesthetic entirely, and one that suits certain clients and settings better than walnut ever would.
One practical note from working with both: the biggest finishing mistakes on boxes happen when makers skip the sample step. The finish that looks great on a walnut offcut from last year’s project may look completely different on the figured maple you just bought. Cut a sample, finish it, live with it for a day. The ten minutes that step costs will save you from stripping and refinishing a finished box.
Ready-made lockable boxes: a practical alternative to building your own
Not every project calls for a full build from rough lumber. If you need secure, odor-controlled storage now, Treelockbox’s shop offers lockable hardwood boxes built with the same material considerations this guide covers, without the shop time.
Treelockbox boxes are built for people who want the result, not the process: secure locking mechanisms, odor control, and durable hardwood construction with optional custom engraving. For cannabis storage specifically, the enclosed design and smell-proof construction solve problems that a DIY box requires careful finish selection and cure time to address.
- Lockable, secure designs with tested hardware
- Odor-control construction for sensitive storage
- Durable hardwood options with American craftsmanship
- Custom engraving available for gifting or personal use
Browse the full lockable stash box collection to compare sizes and configurations, or go straight to the shop to find the right fit.
Sources
- The Wood Database — Hard maple and Walnut reference data
- Exploring wood pairing: combining walnut and maple
- Wood finish comparison: Choosing the best finish for walnut — Mad Tree Woodcrafts
- 2x4 vs Walnut Box — Newton Makes blog
- Finish for walnut/birdseye maple box — Sawmill Creek forum
FAQ
Which is better for a wooden box: maple or walnut?
Walnut is better for keepsake and display boxes where appearance drives the decision; maple is better for high-use boxes and drawer boxes where hardness and edge durability matter more. The right answer depends on whether the box needs to look premium or perform under daily wear.
Is walnut wood more expensive than maple?
Yes. Domestic black walnut typically runs $8–$15 per board foot at US hardwood dealers, while hard maple usually falls in the $5–$10 range. Figured or crotch walnut costs considerably more.
How do you tell maple from walnut?
Walnut is dark chocolate-brown with an open, moderately coarse grain; maple is pale cream to off-white with a very tight, fine grain. End grain confirms the difference: walnut shows larger, more visible pores, while maple’s end grain is dense and nearly pore-free to the naked eye.
Can you use walnut and maple together in the same box?
Yes, and it is one of the most effective pairings in small box work. Use walnut as the primary visual field and maple as accent strips or secondary surfaces. Acclimate both species together, plan for maple’s slightly higher seasonal movement, and seal walnut with shellac before applying a unified topcoat to prevent oil migration.